

 Tuesday, March 01, 2011

 Phase One are a Danish company that operate globally and are extremely popular with fashion and still life photographers. Well known for their medium format cameras, backs and lenses, they work closely with Mamiya and own Leaf.
Current backs include the IQ180, an 80 megapixel medium format digital back. Of course, a back as powerful as this requires a processing program equally as powerful. Enter Capture One Pro 6. Building on the extremely popular Capture One name, version 6 offers several new features to play with.
Capture One Pro 6 costs $399 / 299 EUR.
Installation
We installed the program from the Phase One website and downloading it took less than ten minutes. Installation is even faster but there are a few things to do before you can start playing. Initially, to download the program, Phase One require you to register with them and create a profile. You have to register this profile against the software with an activation link and once that's done, it's time to experiment.
You'll find two windows open at the beginning, one is the program and the other is a nifty welcome window with a few links to help if this is your first time using Capture One Pro 6. Especially if this is your first time, you may feel more comfortable using the simplified workspace. You can have the welcome screen open up each time you launch the program to access the tutorials and help pages whenever you need them.
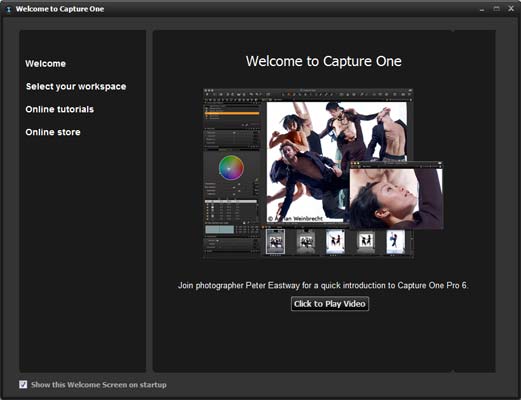
Welcome
Importing
There are several ways to import and view your images with Capture One Pro 6. The most frequently used option will be the common import tool, although what I like about what Phase One have done is make it as simplistic as possible while retaining an air of professionalism. At this point, you can name the job which will then allow you to batch rename all the images or selected images in the folder. You can add numbers to the end to discern between them as well. You can add your copyright details here and all this information will be added to the metadata of each picture.
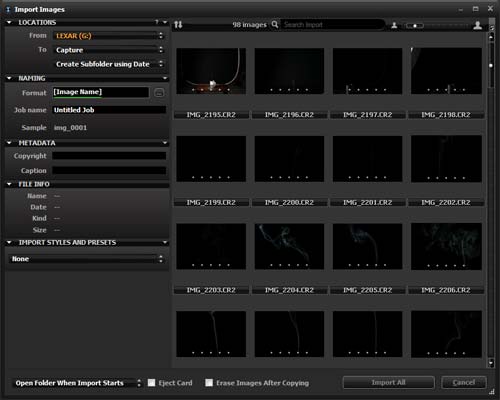
Import
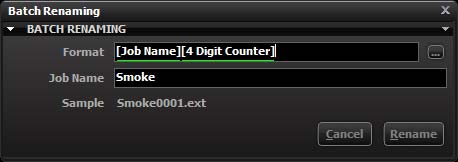
Batch Rename
Capture One Pro 6 supports tethered shooting and this can be done by selecting a new session in the file tab and using the tethered option there. Tethered shooting has a new Live View mode which will bring up the image on the computer screen in real time to allow for super fine tuning of focus, composition and lighting.
Arguably the coolest new import device that Capture One Pro 6 offers is the Capture Pilot. You can download an app onto your iPad, iPhone or iPod Touch and link it via wifi to the computer you're tethered to. As soon as the picture appears on the computer screen, it appears on the iPad. This is a great marketing tool for clients wanting to see the shoot and it allows some space around the computer.
For those of you who are enjoying the sudden popularity in DSLR videos, you will be able to enjoy the integrated video import feature. It's as simple as importing pictures, with thumbnails of the files displayed in the import window. Once they've imported, any videos will be displayed with an eye icon to indicate you can view but not edit them.
Organise and Integrate
One thing that surprises me about Capture One Pro 6 is that before you even get to edit the pictures, there's so much more you can do. If you need to rename an entire folder, this can be done at the time of import or later on by selecting the images you want to rename and either right click, batch rename or choose the same option in the file tab at the top of the screen. Images can have the project name added to them as well as a numerical code between 1 and 6 numbers. Alternatively, you can choose other information that can be dragged from the EXIF data such as ISO, aperture, focal length or shutter speed.
As well as renaming pictures, it's also possible to rename metadata by selecting the metadata tab in the top left corner. The photograph's main EXIF data can't be changed, obviously, but IPTC data such as the photographer's name, address and contact details can. A description of the image can be added, keywords and even GPS information.
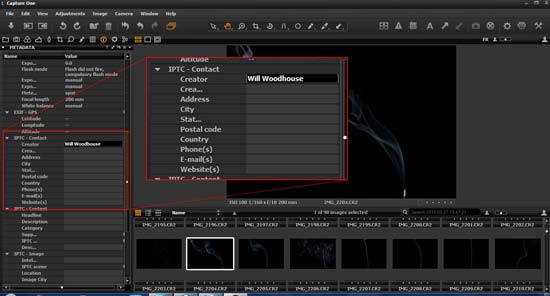
IPTC Data
All this information is good for the client but when you're attempting to stay on top of a massive collection of images, what good is all this ground work going to do for you? The keywords are the.. well, the key, really. They will allow you to search through your folders and find the picture you need by adding strong search criteria. It means that in the future if you're looking through the folder for a certain type of picture, you can simply tap a keyword into the search field above the thumbnails and the images with matching keywords will be filtered out.
It can be difficult to decide which pictures to use without seeing the pictures in a lot of detail but zooming in and out can be time consuming. There are a number of features to use to ensure the pictures you use are sharp in all the right places. For example, the full screen mode will allow you to open a new window to just look at the picture without the thumbnails or information panels at the side. If you have two monitors you can place this on the second monitor to organise your workspace. One of the better features is the Loupe. It's a cool, quick view magnifier that means you don't have to use a zoom tool. The zoom button is at the top denoted by the magnifying glass and if you right click the icon, you can choose the loupe tool from there. After that, simply click on the area you want to look at. Alternatively, you can use the focus mask which will highlight in green the areas of the picture that are in focus.
Loupe
Adjust and Optimise
Finally we get to the best part of Capture One Pro 6. Let's face it, it won't be as versatile as Photoshop but you can perform editing tasks such as curves, levels, spot and noise removal. New features include local adjustments that are non-destructive, black & white conversion and keystone correction for perspective control. The black & white conversion system is especially useful if you're keen on black & white photography. You can set Capture One Pro 6 up for black & white work by changing the workspace to black & white work under the window tab. In preferences, you can also change the background to a lighter colour to ensure more precise blacks and whites.
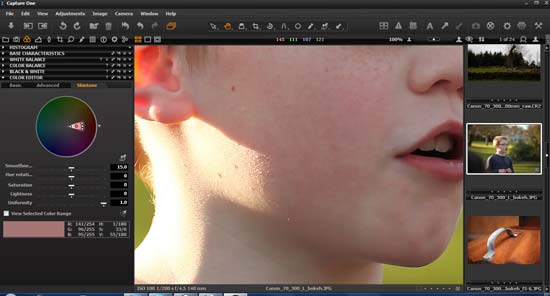
Skin Tones
I like the skin tone enhancer, it's extremely precise if used properly. Found in the colour editor, click on skin tone, find the area of a problem and click on the pick skin colour icon above the sliders. From there, you can adjust the uniformity of the pixels that surround the tones you've chosen. The tones on the colour wheel can be changed by moving the points on the wheel. To see what colours are in the selection zone, tick the view selected colour box and the colours not in the selection will be greyed out of the picture.
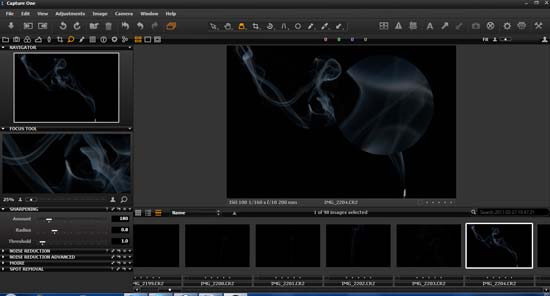
One thing I've always been annoyed with is noise. I really can't stand it so I'm always keen to see how a noise correction feature works in programs. The noise reduction tool in Capture One Pro 6 is found in the details tab where the focus, sharpening and moire tools are. In the basic noise reduction area, you can change luminance and colour noise and there's a single pixel slider too for erasing single points of off colour. Capture One Pro 6 will analyse the image and extrapolate what noise reduction to apply to the picture and applies it automatically.
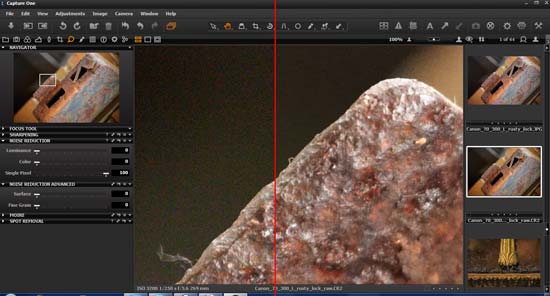
Noise Reduction
The illustration shows the true image on the left and what Capture One Pro 6 feels should be the setting on the right. Luminance was set to 25 which was spot on but I felt that the Colour noise at 54 could do with a little extra so I raised it to 64. Single pixel was best at 100 but this is subjective. After using the noise reduction facility on Capture One Pro 6, I found it very powerful and effective. I love the single pixel slider and it's great that as well as a basic noise reduction setting, there's an advanced option too. It's a great system to use and I actually prefer it to Adobe Bridge which was my favourite before this came along.
 Posted in: Photo Edit software


0 comments:
Post a Comment